Over the past couple weeks we’ve been taking a look at recording from a basic standpoint. For somebody that wants to do simple recordings without a lot of extras, it works. However, through the course of discovery and learning we’ve also uncovered some issues that keep us from creating the very best recordings we can.
Audacity, although powerful is highly limited by it’s inability to edit in real time. This makes all of it’s effects and corrective processes a study in trial and error. In a pinch, you can work with it, but it’s certainly not ideal.
We’ve also seen that the low level equipment we’re using creates audio artifacts that aren’t desired in a quality recording. Proof that sometimes, you do get what you pay for.
So how much is this going to cost me? The truth is building a studio capable of creating quality recordings will cost some money. Fortunately, You can get some equipment that you need right away on the cheap, and build as you go. Things like monitors, pro level software and ultra fast computers can be purchased at separate times as money allows.
With that said, let’s start by setting the space. It may seem trivial, but if you consider the properties of sound, setting the space is the first thing we need to do to create quality recordings.
Sound waves travel through the air around us, bouncing off walls, furniture electronics and even you! This gives us natural reverb and stereo space. It can cause issues however. Rooms that are symmetrical tend to stack sound waves on top of each other and create boomy, hard to manage sound. Knowing this, we try to keep studios out of square rooms. Moving your studio space to an area with random walls and a less symmetrical space is one of the best things you can do to enhance your sound both on the recorded end, and the post production end. It’s also incredibly cheap!
Along that vein, knowing that sound bounces off objects it comes in contact with, it makes sense that these waves would start stacking on themselves in room corners. So, rule number two of the studio space is “keep your editing space out of the corner!” Corner desks look nice, and save space but aren’t ideal for the recording and editing environment.
Ideally your desk space would be in the center of your studio space far away from any walls, however for a home studio that’s highly unrealistic. Instead try pulling your desk and speakers away from the wall six to eight inches. Pull your speakers as far away from the wall as your desk will allow.
As an example of work space here is a picture of my home studio.
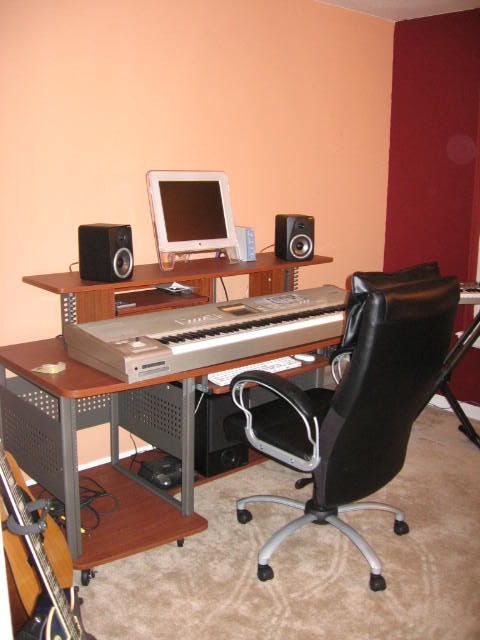
Notice here how my studio desk isn’t completely backed up against the wall and the speakers are pulled forward on the ledge. This helps reduce what is known as early reflection. When early reflection occurs you’re hearing sound that has already been bouncing off walls and other items almost in tandem with the raw uninterrupted sound from the speakers to your ears.
Also notice here that my monitors are angled in towards my seated position. Although not critical in the recording phase, this helps when editing in post production. Having the speakers angled towards you help to differentiate the stereo pan left and right. In this position a mono signal, such as the vocal track, will be centered on you and won’t dive to the right or left field artificially.
Depending on your desk and room setup the angle at which you may need to direct your sound from your speakers will change. This literally is a trial and error concept that will be different for everyone.
In later articles I’m going to talk about room treatments to correct any sound stacking issues you may have in your studio. For now however this should serve as your basic studio setup and we’re ready to start talking about some gear and software.
Going from the knowledge that we’re going to be recording at least guitar, there’s a few items we need to create quality recordings the best we can from the get go.
First we need an audio input. This can range from built in sound cars with quality audio input to firewire Pro Tools HD setups that record 16+ tracks simultaneously and cost many thousands of dollars. Lets look at what we need however. My personal opinion on the subject is that any recording studio needs the ability to record no less than 2 tracks simultaneously. Without this ability we lose some depth of recording that we’d like to see (or rather here) with an acoustic guitar for instance.
There’s a wide range of USB or Firewire based audio interfaces on the consumer market. Each of them do primarily the same job and with proliferation of cheap consumer level products all of them tend to do their job very well.
My studio uses a Digi-Design M-Box with Pro Tools LE. This is an entry level pro system capable of creating the framework for radio playable recordings. This option at around $450.00 is still a little pricey however. Considerably less at a $150.00 price point is the M-Audio Fast Track USB audio interface. The M-Audio Fast Track still records in the industry standard 24 bit/48Khz sample rates, as well as providing 48v phantom power for XLR inputs. It even includes a copy of Pro-Tools M Powered Essential, which is a stripped down version of Pro Tools LE or M Powered that is still powerful enough for the every day studio.
You can’t really go wrong with either of these options, or any of the countless others I haven’t talked about. Until you start looking at interfaces that record 8 tracks at once and you need zero latency monitoring, they’re all going to be quite equal in performance. Choose the one you like the best, for you.
Now we need software to control the audio interface and capture the incoming signal. As with audio interfaces, there are a multitude of software suites designed to do just that. A quick list of such software is Pro-Tools, Logic, CakeWalk, Nuendo, Cubase, Reason with “Record,” Ableton Live and Kontact. All of these programs do the same basic tasks, but in slightly different ways.
Due to my Gear Acquisition Syndrome I’m sad to say my studio uses a remarkable number of the software suites I listed. For myself, certain suites do different things a little bit easier and thus, depending on what I’m producing will dictate what I use. For recording instruments and vocals I always default to Pro-Tools however. There is a reason that it’s the industry standard and that’s because when it comes to recording it simply does everything right! For production projects where I’m working in a virtual space with software instruments and controllers I prefer to work with Logic. It’s virtual instruments, effects and audio sculpting capabilities aren’t rivaled from a sound design perspective. However, past version 6 Logic is no longer available on the PC platform and has gone completely Mac based.
My opinion from a beginning studio standpoint is that every studio should have at the very least a copy of Pro-Tools LE and Reason. The two programs together create a powerful recording and production suite. Reason’s drum machine and drum samples, given the price of the software, is unmatched. The fact that it can be Re-Wired and controlled by Pro-Tools makes the production limitations within Pro-Tools non-existent.
Whatever software suite you chose, make sure that you feel comfortable navigating it’s user interface. There’s nothing more creatively limiting than not feeling comfortable in your work space. No matter how powerful your software and hardware, if you can’t proficiently use it, you won’t get the most out of it.
We’ve covered quite a bit of information on setting up a quality studio in this article. Your homework for this week is to research audio interfaces and software suites. If you’re at a place where you want to further your recording prowess, this is the place you need to start. I’d like to see all of you interested and financially capable to create yourself a small slice of studio heaven in your residence, over the next couple of weeks. I’m going to be discussing more studio setup and then we’re going to start a “Bob Ross” style recording project starting from bare bones to a complete production that encompasses live recording, virtual instrument production, drum programming and mix down editing.
Below I have listed websites for the products I have listed in this article. Beyond that you may also browse music super stores like Sweet Water, Musicians Friend and Guitar Center for additional products that I haven’t listed. Spend the week doing your research and setting up your studio space. I’ll be back next week with some more recording fun!
Pro-Tools M-Audio Reason
Kontakt
Logic
Cubase
Ableton Live