In this series so far, we have covered what it takes to get in to a variety of different recording setups utilizing Digidesign's Pro Tools. We've also looked at session setup settings and basic editing and tempo mapping. Now we're going to apply all this by starting with a simple practice session over a backing track. Not only will this help you further familiarize yourself with the material covered so far, you will be enlightened as to what a valuable practice and learning tool Pro Tools can be in developing your playing! You'll also learn some more tips and "how to's" along the way that will help you as you take on other recording projects. If you haven't thoroughly read the previous articles in this series, please do so, and then come back to this one.
Start by creating a session with your custom I/O settings. Next, create a click track and choose a sound that you are comfortable with. To import one of the backing tracks you've been wanting to master, go to File/Import/ Audio... and a dialog box will appear:
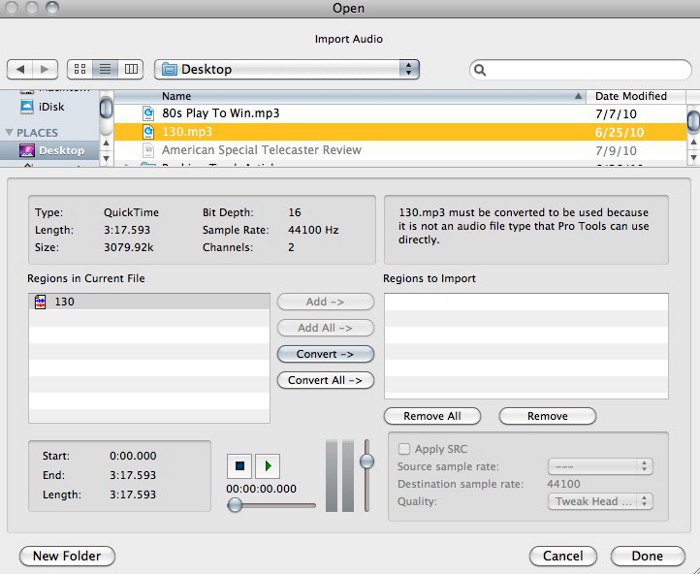
I have selected the MP3 called "130" to be imported. This is a great window because it allows you to do much more than just import audio in to your session. Once you have selected a compatible audio file, information about the file appears just below the file selection section of the window. If the audio file is anything different than the file format your session is set to and/or it is a stereo audio file, it must be converted into a format that Pro Tools can use. This is one way Pro Tools differs from some other recording programs out there. Some software packages allow the simultaneous use of unconverted 16 bit and 24 bit stereo and mono files within the same session. Pro Tools insists that all files in a session are a single type. This helps with file organization as well as smooth operation when sessions get larger and more complicated.
If you are importing a file that is at a different sample rate than your session you WILL want to "Apply SRC," otherwise your newly imported file may play back at the wrong speed.
Once you've selected the file in the top portion of the window, you must select the file again under "regions in current file" and click convert before hitting done. SRC and forgetting to convert or add before exiting the window leave some people quite confused. If you are adding a mono file that is in the same format as your session and does not need to be converted, the "convert" option will change to "copy." I recommend always converting or copying the file rather than simply "adding." When you copy or convert a file, Pro Tools adds a fresh file to the "audio files" folder within your session folder. Adding does not create a new file so if you are cleaning house and moving files around, you may cause Pro Tools to lose track of that file. It always works better to use consolidated audio folders within a session for organizational sake.
After clicking "done" Pro Tools will ask you where you would like to save the new file. By default, Pro Tools suggests saving in your sessions "audio files" folder. Once you give the okay, Pro Tools then converts your file and then ask you if you would like to import to a new track or region List. For now you will choose "new track" and import to the start of the session.
Next, we need to determine the tempo of the track so we can work with the Grid Mode if we choose to. We covered this in the last article, but here's a quick review of one way to determine the tempo:
1. Under the "window" menu, select transport.
2. Under the "view" menu, go to "transport" and make sure all options are checked.
3. Disable the conductor track causing Pro Tools to run in manual tempo mode (make sure the lower left button that looks like a picture of a conductor is not blue).
4. Press the space bar to begin playing the track and while it is playing, click on the tempo number so that it is green and begin tapping the "T" key on your keyboard to the quarter note value of the song.
5. Once you have locked in to the tempo, hit "ENTER" on the numeric keypad side of your keyboard.
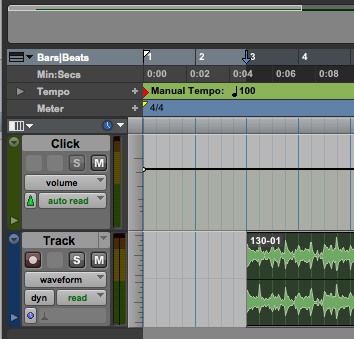
Before we verify that the tempo is correct, we have to make sure that the first downbeat of the track lines up with the grid. Most tracks to not start directly with the downbeat at the beginning of the file so some trimming is necessary.
1. Mute the click track and play the backing track from the beginning of the file.
2. Make a mental note of what the waveform looks like when the first downbeat hits (Do not include any 'pickup' beats. We need a solid "1").
3. While in slip mode, select the "trimmer tool" and trim off the beginning of the track so that it starts directly on the first down beat.
4. Switch to absolute grid mode, select the "grabber tool," and move the first downbeat TWO complete measures from the beginning of the session. This gives you some count-off time at the beginning.
Un-mute the click track and navigate around to different parts of the song to see if the click remains in sync with the backing track. Odds are, it might not be perfect, so you may need to re-tap the tempo a few times, or adjust the tempo manually by entering in tempo values until you find something that stays in sync the whole song. While adjusting the tempo, you'll need to move the file back in to place each time so that the downbeat happens right on the grid.
Once you have a click track that syncs with your backing track, go back to the "trimmer tool" and, while in slip mode, drag the region out to the beginning of the file. This way, you hear the pickup measures if there are any.
Notice in the above image that, at this point, you can now see the track mapped out measure by measure.
At this point, I like to listen through to the song and make markers where there are significant changes or points of interest within the track. For example, if the track has an "A" Section and a "B" Section, I go through and mark each time the track changes. Or if there are key or mode changes, I make markers so that I can see what’s coming next and mentally prepare.
To view markers in a session, go to view/rulers and check "markers."
To make a marker, simply select a point in the timeline and hit the "ENTER" key. A dialog box will appear allowing you to choose a name for the location. To be sure that markers are behaving correctly for this application, go to setup/preferences.../editing/memory locations and be sure that "auto name memory locations" is unchecked. Since you'll be in grid mode while creating markers, the markers will also snap to the grid allowing you to make notes that directly sync with the changes in the track. Once you are finished with this, your Edit Window should look something like this:
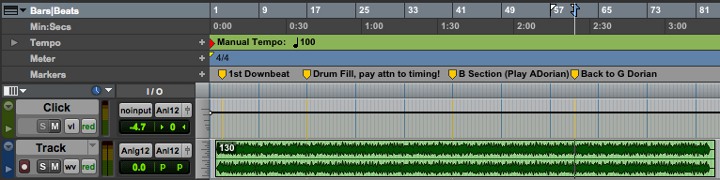
Taking the time to do this initial setup helps you to make the most of your practicing and recording. Not only do you have a measure accurate grid in place, you've already taken time to listen through the track, analyze certain sections and formulate a game plan for playing and practicing, and you've made notes with the markers so you won't forget!
If you haven't done so already, I strongly urge you to read: "
Critical Practicing and Listening with Backing Tracks." This article can be found in the "Guides" section of the site and will help you formulate the right questions to ask yourself as you are preparing to maximize your playing!
Now we're ready to add the guitar track. Create one new mono audio track and set the input to where your guitar is plugged in on your hardware. Make sure that you are using a standard guitar cable and that you are plugged in to the "instrument" or "DI" input. If you go to view/edit window views and check I/O and inserts A-F, you will be able to see and make changes to the input and output of each track right from the edit window. You'll also be able to adjust volume and pan as well as access your inserts/plugins without having to toggle over to the mix window. Having all this control on one window is great when your in the middle of tracking yourself and don't want to waste time navigating around.

In the I/O section of each track, the top box the to the right of the name is the input select and the one directly below it allows you to select the output. Clicking on the volume and pan areas allows you go adjust each of them.
Most of us have rigs that we love using, maybe a favorite amp, a floorboard etc... While you can spend time getting those micd up or lined in to your Pro Tools system and should experiment with that, (we'll get in to mic techniques and working with tone in later articles) for this exercise I recommend using the Eleven Free Plugin if you are in Pro Tools LE or M-Powered. If you are using Essential, the included SansAmp PSA-1 plugin will work just fine. Dial in a quick comfortable tone that suits the style of playing you're going for and get started. You may also choose to explore some included effects such as delay or chorus. All of these plugins should be placed in the track inserts section (the middle section between the track name and the I/O info). The virtual amp (Eleven Free or SansAmp) should be placed first (or on the top insert slot) followed by any other effects.
The reasons I recommend using included software amp processing for this exercise are as follows: You can manipulate the tone and effects after you have recorded your take. This allows you to experiment to a greater degree with discovering tones and effects. Also, because the effects are not written to the recorded file, you get the opportunity to see unprocessed, raw guitar recorded to the track. This makes editing, punching in and just plain seeing where you are and what you are playing much easier. Guitar tracks that have all the distortion and effects written to the file are very hard to analyze. They work, and in many ways are preferable in certain settings, but if you're following this article series, you are likely just getting started with recording and editing along side your guitar playing.
Let's look at the transport window (window menu/transport) and all that it has to offer as you record your playing.

Remember that in the views menu all options except sync must be checked to get a transport like the one pictured here. Below the obvious record/play/stop/ff/rew controls is the pre and post roll section. We've already set our session up to have two measures before the first downbeat for ease of beginning the track. If you're like me, you might like to really focus on a particular section of the track so that you can really practice coming up with musical ideas. Let's say I just want to work on measures 40-62, and I wanted to automatically record punch in after two measures of playing. So the track would start playing at measure 38, but I won't start actually recording till measure 40. I would click on the pre roll box on the transport so that it turns bright green, then I would set the pre roll length to 2 measures (as it is displayed in the image above) The pre roll will be expressed as whatever the primary counter is set to. The primary counter is the top large counter, and in this case it is set to bars/beats so you can choose to set your pre/post roll in bars/beats. If your primary counter displayed min/sec, you could enter for example, 10 seconds of Pre roll. Since we’ve set up our session to play nicely with the grid, we'll leave it in bars/beats mode.
With pre roll and post roll both engaged, if you set your cursor location to the place you want to begin recording and hit record, the track will start playing 2 measures before your location. If you select a number of measures like our 40-62 for example, the track will start playing 2 measures prior to automatically dropping you in to record and then continue to play 2 measures after bringing you out of record. This is great tool for changing small sections of the track as well if you are happy with most of the take in general but want to say, just fix bar 4 and leave the rest alone. You don't need someone pushing buttons. You can set up everything to happen automatically and focus on playing and recording.
In the upper right area of the transport, there is an option to set and enable/disable a count off. A count off differs from pre/post roll in that a count off will simply give you a set number of measures of click before it starts playing the track, whereas pre/post roll actually plays the track and lets you play along with the music before dropping in to record. Experiment with both and see what suits you best.
The last little workflow tip that we'll look at is the use of playlists. Pro Tools has the ability to save multiple takes within one track. This is great for a number of reasons. You can save off each one of your takes as you are practicing to see how your playing has improved over the course of your practice time. Or if you are looking to record something over a track that you wish to share with others, you can use playlists to combine different takes to create the ultimate single lead part. While Pro Tools didn't exist when Pink Floyd's "Comfortably Numb" was recorded, David Gilmore and the recording engineers utilized a similar method when capturing the famous guitar solo. What you hear on the album is actually a composite of 4 different takes recorded at different times.
To work with playlists on any given track, locate the down arrow just to the right of the track name and click (After recording the first take you wish to save). You will have the option to create a new playlist or duplicate the existing one.
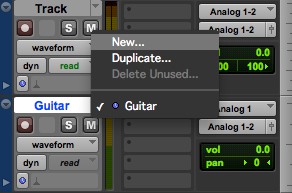
Regardless of which one you choose, you'll have the option to name it. Duplicating is useful if you plan to punch in and fix a number of places, don't want to re play everything, but still want the original take to refer back to for later editing or listening. Creating a new playlist is great when you sit down to play through a track a number of times and want to save off each take for later reference.
Here's how I like to work when I'm practicing over a backing track: I use the recording software as a way to critically listen to and improve my playing, then I use it more to help me musically craft an entire track that I am proud of and that represents some improvement over the last track I played over.
I start by setting up the track as detailed in this article. This includes listening to it multiple times, making notes and markers that help me think through what I want to play and how I want to play it. Then I record 5 passes. Each one seems to get better and better but there are parts that I like from all of them usually. I save off each pass as a new playlist. I might punch in using the pre/post roll technique on each track a few times. When I'm reasonably happy with all 5 takes, I choose my favorite and then make notes of what I like about parts of the other takes.
At this point I might select certain parts of the other takes and copy/paste them in to my favorite take, and then I will punch in a few more ideas I have on my favorite take after combining ideas from the other takes. When it's all said and done, I have a VERY well thought out and polished complete "final take."
You might be thinking "that's a lot of work to just play over a track," and you're right, but the rewards of working this sort of workflow in to your practice and playing are amazing! It teaches you to be intentional about every aspect of your playing, from the scales you use, to improving your technique and incorporating new licks and music theory ideas. As you do this more and more, you'll start to realize that your initial ideas get better in less time, and you'll start to notice your improvisational skills also improve tremendously!
Give it a try and let me know how it improves your playing!